Pizza night is always a favorite at our house!
There’s just something special about homemade pizza. The smell of the dough baking, the bubbling cheese, and all your favorite toppings coming together on a crispy crust make it worth the little bit of planning ahead.
My homemade pizza dough costs very little to make and requires almost no skill. If you’ve been intimidated by making your own pizza crust, I’m here to tell you that it’s much easier than you think. Take a look at this blog with all the Dough tips!
Now, let’s build the pizza!
The Secret: Make the Dough Ahead
I use a “no-knead” dough recipe. Simply mix it together, let it sit on the counter for about two hours, and then transfer it to the refrigerator.
You can use it:
- The same day
- The next day
- Up to one week later
The longer fermentation gives the dough incredible flavor and texture.
Step 1: Divide and Shape the Dough
This batch makes two pizzas.
Start by generously flouring your work surface and your hands. I like to do that on our Pastry Mat.
This dough is a little wetter than traditional pizza dough, so don’t be shy with the flour.
Cut the dough in half and gently fold the edges underneath itself until it forms a smooth ball.
Homemade pizza dough doesn’t need to be perfect. A rustic-looking crust often turns out to be the most delicious!
Step 2: Stretch the Dough
You can:
- Stretch the dough by hand
- Use a Baker’s Roller
- Use a combination of both
Pizza purists will tell you that hand-stretching creates the best texture, but do whatever works for you.
The goal is simply to create an even crust.
Step 3: Use a Hot Pizza Stone
This is the most popular Pizza Stone which is 15” Round. We do carry several shapes and sizes.
While you’re shaping the dough, preheat your oven to 430–450°F with your pizza stone inside.
A hot stone helps create that crisp, bakery-style crust.
Carefully transfer the dough directly onto the hot stone.
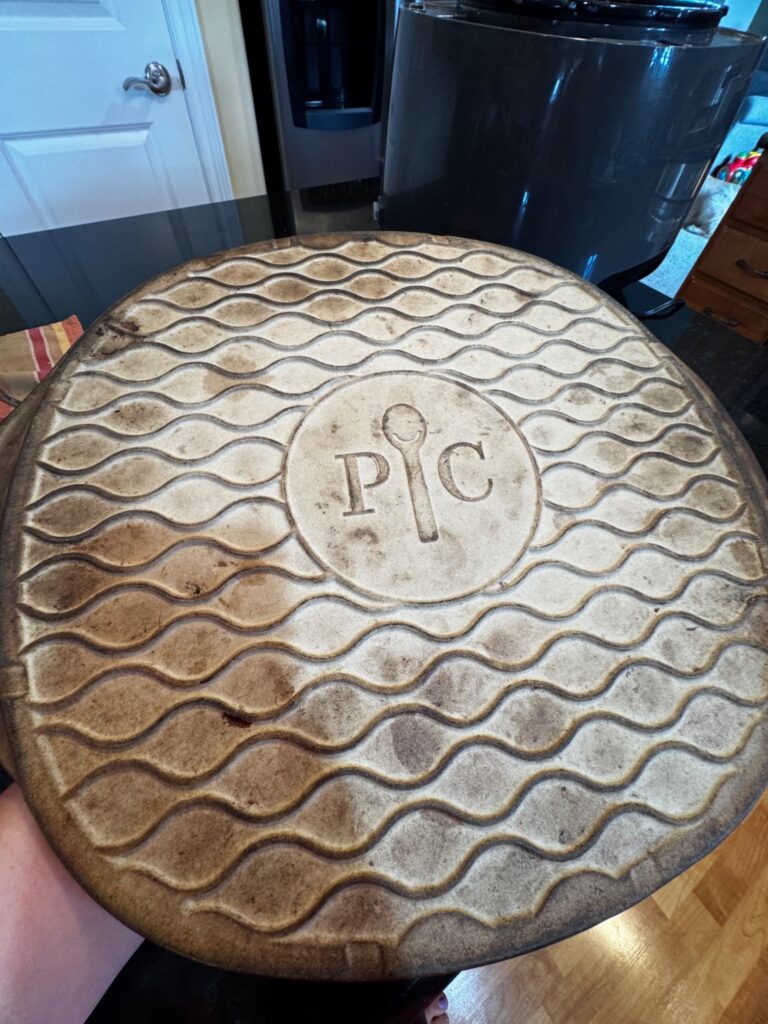
Julie’s Tip:
Pampered Chef Stoneware created after September 2020 is ok to pre-heat. If you have a Stone made prior to that, we do not recommend that you pre-heat them. How can you tell when your’s was made? Look at the underside. If you see a wavy design on the bottom yours was made since 9/20 and ok to preheat.
Many people use a pizza peel, but I often transfer the dough by hand. Since I like to load my pizzas with toppings, I find it easier and more reliable.
Just be careful around the hot stone!
Step 4: Build Your Pizza
Here’s a little trick that makes a big difference.
Instead of putting the sauce directly on the dough, start with:
- A light brush of olive oil and add a clove of minced garlic if you like. Brush it all over the dough. Our Garlic Press is perfect for this task.
- Half of your mozzarella cheese
This creates a barrier between the sauce and the crust, helping prevent sogginess.
After that, add:
- Pizza sauce
- Remaining mozzarella cheese
- Parmesan cheese
Why Multiple Cheeses?
Using mozzarella and Parmesan together creates deeper flavor and a more restaurant-style pizza.
It’s a simple upgrade that makes a big difference.
Step 5: Add Your Favorite Toppings
Today I’m making a classic pizza with:
- Pepperoni
- Onions
- Bell peppers
- Fresh garlic
- Italian seasoning
Julie’s Tip
Vegetables contain a lot of moisture.
It’s easy to overload a pizza, but too many watery toppings can lead to a softer crust. A lighter hand often gives the best results.
Don’t Skip the Fresh Garlic
One of my favorite pizza upgrades is adding fresh garlic right on top before baking.
I used about six cloves and I chop it coarsely with the Garlic Prep Tool.
Because the garlic roasts while the pizza bakes, it becomes sweet, mellow, and absolutely delicious rather than overpowering.
Trust me on this one!
Step 6: Season and Bake
Finish with a generous sprinkle of Italian seasoning.
Then place the pizza on the bottom rack of your oven and bake for about 16 minutes.
The exact time will depend on:
- Your oven
- Thickness of your crust
- Amount of toppings
Keep an eye on it toward the end.
How to Tell When It’s Done
Carefully lift the edge of the pizza and check the bottom crust.
You’re looking for:
- A crisp bottom
- Golden brown edges
- Bubbling cheese
If you like a darker crust, simply leave it in for another minute or two.
Let It Rest
Once the pizza comes out of the oven, let it sit on the hot stone for a couple of minutes before slicing.
This helps everything set up and makes serving much easier.
Why Homemade Pizza Is Worth It
Homemade pizza is one of the most budget-friendly meals you can make.
The dough costs very little, you can customize the toppings based on what you already have, and everyone gets exactly what they like.
It’s also a great way to use up vegetables, leftover meats, and bits of cheese hanging out in your refrigerator.
Final Thoughts
If you’ve never made your own pizza from scratch before, give it a try. It’s surprisingly simple, incredibly affordable, and tastes fantastic.
Once you get comfortable with the process, you’ll find yourself experimenting with different cheeses, toppings, and flavor combinations.
There’s something really satisfying about pulling a beautiful homemade pizza out of the oven and knowing you made it yourself.
What’s your favorite pizza topping combination? Are you a simple cheese pizza fan or do you love loading it up with everything? Let me know in the comments!
Leave a Reply