
Would you believe this is gluten-free sourdough? With a beautiful crust, a lovely crumb, and that familiar sourdough aroma, this is the loaf I’ve been waiting to share.
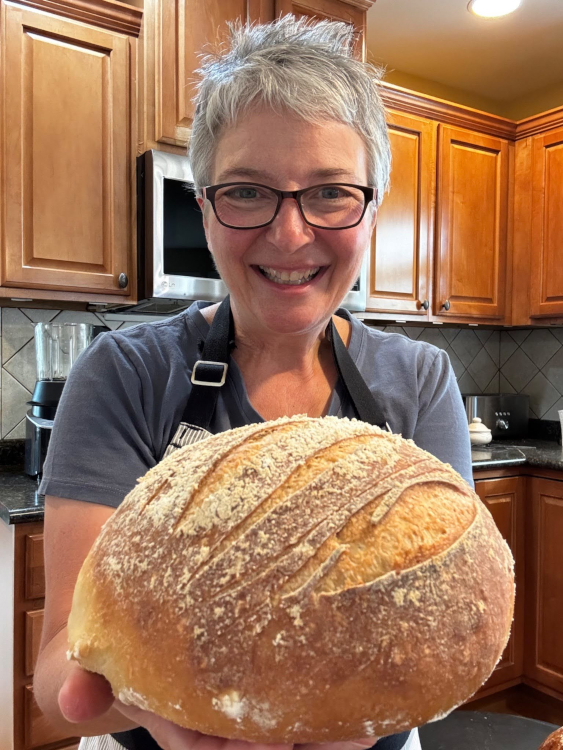
I love making bread, especially when I can make something everyone in my family can enjoy. Gluten-free sourdough took a little extra patience as I learned how the dough behaves, but that first slice made the whole process worthwhile.
If you’re used to traditional sourdough, a few things will look different along the way. Don’t worry—that’s part of the process!
A Simple Ingredient List
For this bake, I followed a gluten-free sourdough recipe from King Arthur, with one change: I left out the sugar.
The recipe calls for sugar, but a response from King Arthur’s test kitchen in the recipe notes explained that it helps with browning. My priorities were texture and flavor, so I decided to try it without any added sugar.
My loaf used:
- Ripe gluten-free sourdough starter
- Gluten-free bread flour
- Salt
- Water
A quick recipe note: This post walks through my baking experience. Refer to the original King Arthur recipe for the complete ingredient quantities and flour specifications.
These are my favorite products for bread baking:
Start With a Bubbly, Ripe Starter
My starter was bubbly and ready to use on day six. That was the timing for this particular starter; yours may take longer, so pay attention to its activity rather than the calendar alone.
I placed my mixing bowl on a scale and weighed out 259 grams of ripe starter, then added the gluten-free bread flour, salt, and water.
Once a starter is established, regular feedings keep it going for future baking. Getting into that rhythm is part of what makes homemade sourdough feel manageable.
Mix, Then Give the Flour Time to Hydrate
I mixed everything in my stand mixer for about two minutes, until thoroughly combined.
This dough doesn’t need the same kneading process as traditional wheat dough. At first, it looks more like a thick batter than the smooth ball you might expect when making bread.
If you look into the bowl and think, “That doesn’t look right,” remember: gluten-free dough behaves differently.
After mixing, I scraped down the bowl, brought everything together, covered it, and let it rest for 20 minutes. This gives the flour time to hydrate before the next step.
Gently Fold the Dough
After the rest, I dusted my hands and work surface with gluten-free bread flour and gently worked the dough on my Pastry Mat.
The goal here is to smooth it out and make it easier to handle. A bench scraper helps, though I like using my large serving spatula with its beveled edge.
I patted and folded the dough about seven or eight times, then returned it to a bowl for its first rise.
Let It Rise Until Puffy
My dough rested for about four hours. By then, it was nice and puffy, with that wonderful sourdough smell. TIP: I like to turn my microwave into a proofing box by turning the light on that creates just the right amount of warmth.
Next, I prepared my proofing baskets with a generous dusting of gluten-free bread flour. The baskets help support the shaped loaves while they rest, and the flour helps prevent sticking.
I gently deflated the dough, shaped the loaves, and placed them in the baskets seam side up. The smoother side sits against the basket and becomes the top when the loaf is turned out for baking.
I made two loaves that day—one round and one oblong. When I’m already making bread, I love baking two at once. It makes good use of the oven, and I can freeze the extra bread for later.
Refrigerate Overnight for More Flavor
Although there is an option to continue toward baking the same day, I chose an overnight refrigerator rest for more flavor.
I covered the baskets with plastic wrap to help keep the dough from drying out and refrigerated them for 16 to 24 hours.
This is where sourdough asks for patience. There isn’t a lot of hands-on work, but the dough needs time. Planning ahead makes the process much easier.
Bake on a Preheated Stone With Steam
On baking day, I preheated the oven to 450°F, with my Stone Bar Pan and a cast-iron skillet inside.
I carefully turned each loaf out onto parchment paper on a pizza peel, then gently lifted away the basket and liner.
Before baking, I scored the tops with a sourdough lame. A sharp knife works, too. Scoring gives the loaf a place to open as it expands in the oven—and it’s a chance to add a little decoration.
Using the peel, I slid both loaves, still on their parchment, onto the hot stone. Then I carefully added hot water to the preheated cast-iron skillet to create steam.
Be careful during this step: the hot water produces a burst of steam, so keep your face and hands clear.
I baked the loaves for about 50 minutes.
The First Slice
Cutting into a homemade loaf is always exciting, but this one felt especially rewarding. After starting the starter, learning how the dough handled, and waiting through the overnight rest, I finally got to see the crumb.
And I was thrilled. I even did a happy dance!
I love the heel of a loaf, so that was my first taste, topped with homemade almond butter I had made just for the occasion. The texture and flavor made this a bread I was excited to bake again.
Give Yourself Time to Learn
My biggest takeaway from making gluten-free sourdough is to let the dough be different. It may look like batter at first. It won’t feel like wheat dough under your hands. And finding your rhythm may take a little practice.
Give it time to hydrate, handle it gently, and leave room in your schedule for those long rests.
There’s something so satisfying about pulling homemade bread from the oven—especially a loaf you’re excited to share with everyone at the table.
Here’s my Blog on how to create your own Gluten Free Sourdough Starter
Leave a Reply